[ Home ]  [ Slide Rule]  [ SR-Annex ]

Scanning Slide Rules; How I do it.


It is best to use a scanner to capture the image of slide rules. Use of a regular photographic camera or a digital camera will result in ambiguous scale factors and lighting setup requires professional skills. Using a scanner, we can get "square" and accurate images.

There is one problem with this method, however. It is that the scanner (A4 European size or US letter size) cannot take a full 10 inch rule in one scan.

I will introduce the method I use in this page.

Contents


The low profile- inexpensive scanners available today are not suited for scanning slide rules because they do not have enough "field of depth". The thinner models will produce all black images if you scan a slide rule.

I am currently using an Epson 9600 which I bought on an Internet auction. This model has enough field of depth but it has been taken out of current production. So, I bought another one for backup. ;-)

For US residents; Hewlett Packard Model Scanjet 4P is reported to have sufficient field of depth. Furthermore, this model can scan legal size objects. If you own this model you can scan a 10 inch slide rule in one scan and do not need to join two images for a ten inch rule. But you may find the following discussion of value when you try to scan a 20 inch rule.


Scanner Setup

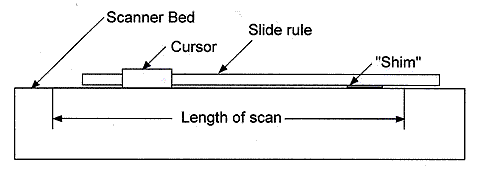
The simplest way to create a scan of a ten inch rule would be to simply lay it on the scan bed and scan two times, taking left and right halves separately and combining the two later. But this will result in uneven brightness of the slide rule surfaces because, due to the presence of a cursor, the distance from the scanning bed to the slide rule surface of one scan is different from the other scan. Because of this uneven brightness, it is extremely difficult to "seamlessly" join two images to form a complete image of a rule.

To avoid this problem I decided to raise the "non-cursor" end with "shim" as shown in the above illustration. After taking the first scan. the rule is is moved to left so that the right end is within the scanning range. The shim is moved further to the left so that, when splicing, the shim can be cut out.

Scan resolution: I use 300 DPI (dot per inch) for all the rules. It gives enough fineness to read detail of the rule.

Alignment: I align the rule roughly by eyeballing. Images can be squared a the later editing phase.


Background

I made a background plate out of a thin wood panel with adjustable feet on four corners. The distance from the scanning surface is adjusted to be 15mm. The "foot" is rubber protected to keep it from scratching the scanning surface.

"Shims"

I crated a set of 60mm x 10 mm shims of variety of thickness, cut out from variety of materials. The thickest being 2.2mm acrylic sheet to the thinnest being 0.3mm paper sheet.


I use Photoshop to edit/ splice scans. Here is a general procedure I follow. I am sure many other image possessing software can do the necessary functions described bellow.

  • Rotate and align horizontally all the images .
  • Splice the images together. The brightness of two images should match perfectly if the surface of the slide rule have been kept at equidistance for all scans
  • Finally bring the brightness of the surfaces a little bit higher to match at both sides. For an open frame rule, both sides tend to be darker. For a closed frame rule, this is important because the back side will be brighter than the front side.

[ Home ]  [ Slide Rule ]  [ SR-Annex ]